Best sleep so far last night since arriving in Medellin!! Must have been the two long days catching up to us. We had a 7:30 pick up for our half-day coffee plantation tour to learn everything about coffee!

This will be our 4th tour here in Medellin and it’s also our 4th tour company, so we are getting a great mix. Today is with Ana from Medellin Day Trips

Ana, our guide picked us up at 7:30 and the others on our trip were 5 friends vacationing in Colombia for Thanksgiving. We couldn’t have asked for a better group of people to share our day with. They were from New Haven Connecticut which both Derek and I have family there!!! I LOVE how small the world is. The only bad part was they made me miss my friends back home and wish they were here sharing in this experience.

We made a quick stop for breakfast and we were off to the plantation which was only a 30 minute drive.

Ana shared some interesting facts about Medellin, like how different neighborhoods have different traffic laws. One really neat traffic law is to limit certain cars on the roads during different times, like rush hour. They do this by license plate. More info: “Under pico y placa you are restricted from driving in Medellín during the rush hours on Monday to Friday from 7:00-8:30 am and from 5:30-7:00 pm depending on the last digit on a license plate for cars and the first digit of license plates for motorcycles.” We did notice how busy the metro was during rush hour on Friday, lines out to the street and the cars packed! (This is good!!).

She also shared that there are a lot of unspoken rules, like never park in the main square of a town – or you will get a ticket. Who knew!! We soon arrived at the farm/plantation which was so nice to not have a long bus ride! We settled in to do our first tasting and get a little background before venturing out to the coffee plant.

It was a beautiful view! If you are considering a coffee plantation tour in Colombia I would highly recommend not only this tour company but choosing a closer plantation. There were others we almost did that were full day tours with hours of driving. It was great to not drive to far and to be back by noon and feel like we not only got our money’s worth but learn so much and had a great time.

We were going to sample coffee in 4 different ways to brew coffee.

1. Bialetti (not pictured but example below in the background)
2. Siphon (above left)
3. Chemex (above right)
4. French Press (above center)

My favorite was the Siphon (above)- very smooth and it took the longest but was the neatest! It uses a vacuum approach to brew.

Ana mentioned a couple rules to coffee brewing and storage (all of which we were breaking but will change now!!) NEVER use boiling water to brew coffee (for example in a french press) it burns the coffee. NEVER store coffee in the freezer (oops) it makes it to humid/wet.

And never buy coffee that doesn’t have a vent at the top for ventilation.

After tasting the different types of brewing methods, and being shocked with how different the coffee tasted just based on brewing process, we were off to pick coffee and learn the process of making coffee.

Below is the either process of how to coffee is made keeping in mind that along the way if you want GOOD coffee there is so much care and technique that goes into coffee. Ana also let us know that at ANY point in this process things could go wrong and you never know what you have until the next step…. if you are wanting the best coffee possible you have to pay attention to every detail along the way.
Ana also let us know that in Colombia coffee production is all done by hand – which after seeing the entire process it was amazing to us that all this is done by hand. Brazil for example does everything with machines which having see the detail and love that the Colombians put into coffee was fascinating and made me definitely not want to drink anything other than hand made coffee.

Step 1: Planting the Coffee Tree. Start with finding a good seed. Take a ripe coffee cherry and squeeze and the beans come out. Typically one or two beans come out but we were lucky three came out and that was the first time that Ana had ever seen that! We heard that it is rare but 4 can come out. I thought these were the coffee beans but they aren’t, they are the shells that hold the coffee beans – more on that later.

These seeds are covered in Mucilage (Mucilage is a thick, gluey substance produced by nearly all plants and some microorganisms.) The Mucilage is what gives the coffee it’s flavor and will come back into play during the fermentation process (more on that later).
Since we are planting the seed and not making coffee right now, wash the Mucilage off the shell, dry in the sun and poke in the sand to plant.

The sand keeps more humidity on the seed and helps with water flow and so the roots can also grow without constraint. The seed actually is what is pushed up through the sand and turns into a leaf called cotyledons which are the first leaves to emerge from the soil when a plant germinates .

When it is ready (2-4 leaves), it is ready to be inspected to ensure it is perfect for replanting, ideally you want a straight root and 2-4 leaves. These are the kinds of things machines cannot inspect. Replant with soil and compost in a bag, iron is a must in the soil. After 2-4 months in bag it is ready for planting in the ground.

Once in the ground the first stage is flowers that grow on the plant and then finally about 9 months later, coffee cherries grow. At this particular plantation everything is organic and reused. That means there is no waste.

Step 2: Picking the Cherries. Once the flowers turn into buds and grow they start as yellow and eventually turn to red cherries. When you pick you are looking for red to dark red. Black is over ripe but you still have to pick so they don’t kill the plant. When you are picking DO NOT throw any beans on the ground – as you can tell so far now monitored the plants are you don’t want rouge coffee plants growing. Coffee trees live as long as you let them but they cut them around 10 years for regrowth and because quality and quantity is reduced.

Picking is very important as yellow tones are different than orange and yellow lime. Orange will go right to black so you don’t want that. When the cherries are red ripe they will be on the trees for 10 days. Yellow are weaker and can still grow but not as strong. January – March is flower season and coffee bean or cherry harvest is October -December. Everyday you pick.

When you pick you want to twist and pull. Size doesn’t matter. The best place for coffee trees are on mountains, because in altitude it helps with bugs and reduces disease and also mountains have the best filtration.

Fruit trees are planted with he coffee trees to encourage birds to come and poop as that helps with the nutrition of the coffee trees. The plants around the coffee trees also affect the taste of the coffee! Something really neat is into of pesticide this coffee plantation will uses rotten fruit and put that at the bottom of the coffee trees so the ants and bugs go to the rotten fruit and not the coffee cherries.

One fruit we tried right from the tree was Limón mandarina which is like a tangerine lemon. I was warned but I tried it anyway – WOW it was tart. Limón mandarina is made into juice and much better as a juice with sweetener (we had some later when our cherries where being processed)


After picking (and learning how hard it is) we headed back with our stashes for the next step (and to see who picked the most!

Step 3: Clean, Sort and Remove Seed. The cherries are put through the funnel where they are then sent through the pulping machine to separate the skin and pulp from the bean.

Then the beans are separated by weight as they pass through water channels. The lighter beans float to the top, while the heavier ripe beans sink to the bottom. They are passed through a series of rotating drums which separate them by size. Lots of ways to see if the beans (or the shells) are good. They need to be unbreakable (bottom center picture) if you can break the shell it is not the best kind of bean. The left over cherries are used for compost, feed and at this plantation some are dried and used for tea. We tried this tea later and LOVED it – which is really cool because it has the passion of coffee but is more like tea and no caffeine.
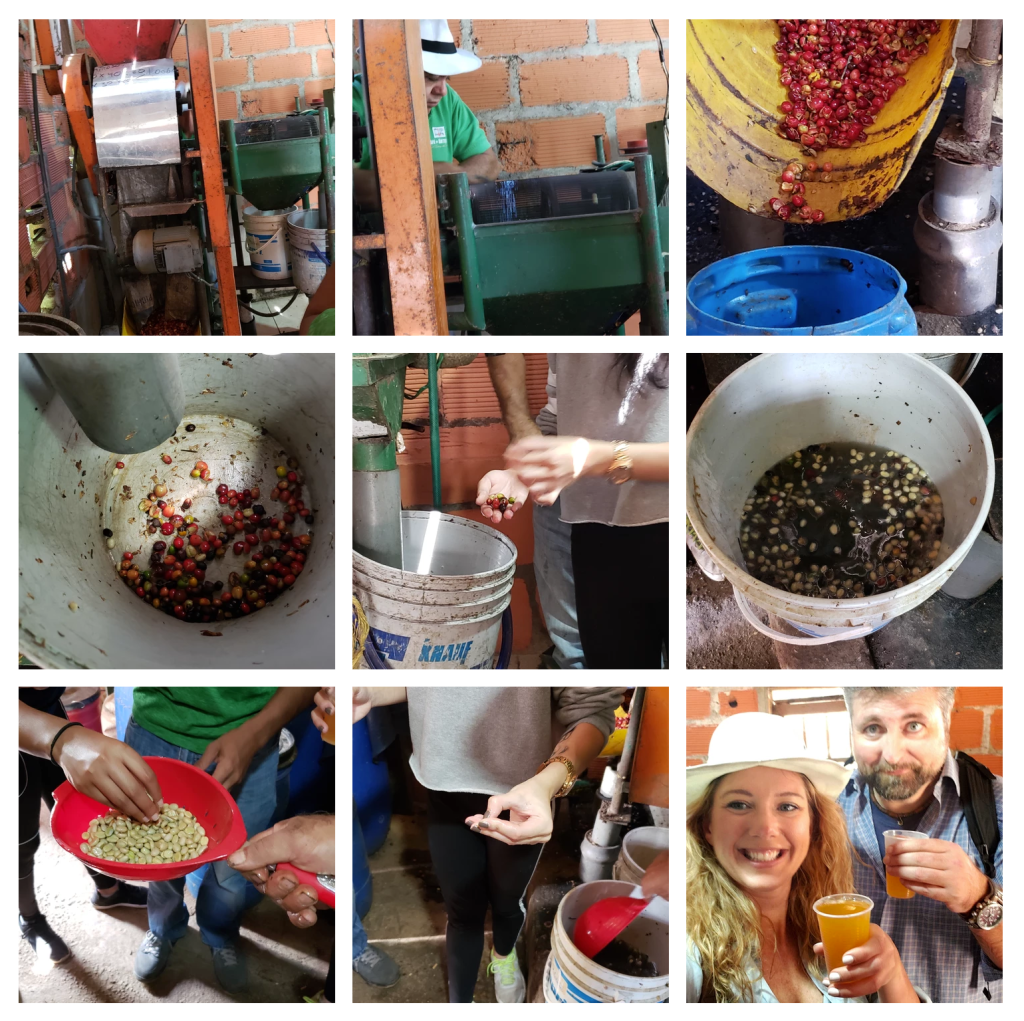
Step 4: Fermentation. Fermentation creates flavor! It lasts about 48 hours and here is where the Mucilage is important (it is left on not cleaned off as it is when the seed is planted) Using fruit, like bananas is a great way to add flavor and is the signature to this plantation. Once the Mucilage dries the fermentation process is down and it is ready for the next step.

Step 5: Drying. Drying takes about a week depending on the weather. It might take two weeks in rain season.

Really important to move beans to ensure every part of the bean is dried.
You can tell if the bean with the shell is dry if you can leave a nail mark on the shell or bite through it, it is not dry. It is not ready if it is dark green. Once dry, it is called parchment coffee and can either be shipped or stored parchment coffee can last up to a year.

The “bad” coffee beans are still used -sold as instate coffee where, according to Ana, they grind up the coffee beans into a paste and burn it dry and add chemicals to make it last.

Step 6: Removing Shell. Also called Hulling. This can be completed with a Hulling machine which removes the parchment layer (endocarp) from wet processed coffee.
The shell removing machine was broken so we could not see that but we were able to see the final coffee bean after they had been hulled!
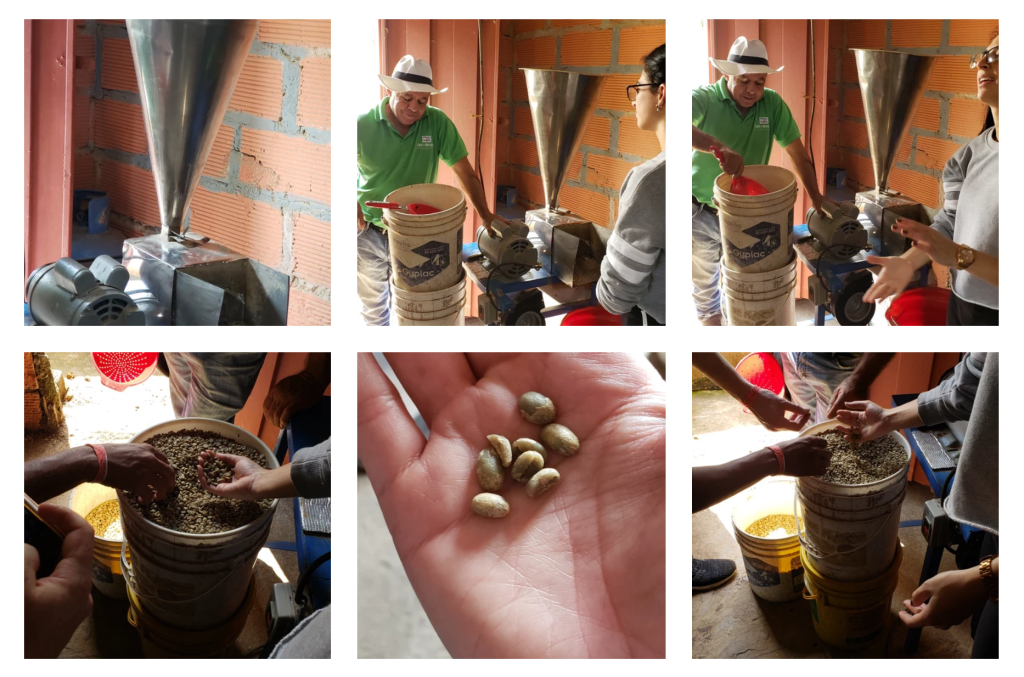
Step 7: Roasting. Raw coffee has a greenish color and when you remove the shell and roast the bean you lose 40%. Roasting takes about 45 minutes and you preheat to 200 degrees and move the beans so they do not get too hot – remember too hot burns the coffee!

After roasting they store in pot to protect the aroma and the beans takes six hours to cool.

Step 8: Bag (or grind and bag). Ready to brew or sell! Coffee packaging is very important, as any exposure to air could dramatically change the taste and put all the time, passion and investment of making great coffee
This is especially the case for ground coffee, which can quickly lose it’s flavor if exposed to air. This is the reason why coffee is usually packed in airtight containers and should be resealed carefully when not in use (and has a vent so it doesn’t suffocate the coffee..

What is really sad, is this plantation only gets 20,000 pesos profit (about $7 US dollars) for a large bag of coffee. AND the coffee is sent to big coffee roasters who mix coffee with other coffee from anywhere and put their name on it after roasting it. There is no need to even list what plantation the coffee beans came from or how the coffee was manufactured.

There you have it! We will never look at coffee the same again. We went back to have a couple more tastings now that wee could fully appreciate the love and work that goes into good coffee production.

We headed back to town and took the afternoon to relax and listen to the Seahawks game. We then headed to Malevo for dinner. My favorite part was the appetizers (below left), the steak as OK, it was an Argentinian steak house in Colombia and Derek said the steak was not as good as it is in Argentinian…might be our next country!

We headed back and packed up and got ready for the last leg of the trip – flying to Santa Marta and then taxiing to Tayrona National Park.
